Step by Step Guide to Installing Artificial Turf in a Dog Area
Active dogs can quickly turn a yard into a mess. Grass wears down under constant use and creates muddy patches. A durable surface provides a practical alternative for pet-friendly spaces. It maintains a fresh look all year with little effort. Correct installation makes a major difference in performance. This article provides a clear path to installing artificial turf in a dog area.
Site Preparation and Clear Surface Area
The first step involves the removal of existing sod and weeds. Workers excavate the soil to a depth of several inches for a solid base. Artificial Turf for Pet Areas provides a reliable solution for a clean yard. The ground must be level and free of large rocks or debris. Proper excavation prevents future issues with uneven surfaces or poor fit.
Base materials create a firm foundation for the new synthetic grass. Gravel or crushed stone works best for stability and moisture control. Laborers spread the material across the entire site for uniform thickness. They compact the base with a heavy tool to create a smooth floor. This step ensures the surface stays flat under the weight of pets.
Base Layer and Drainage Setup
Drainage remains a vital part of a successful pet yard setup. A slight slope helps move liquids away from the center of the lawn. This system prevents puddles and keeps the area dry for the dog. Use a mix of fine and coarse rock for the best flow. Good air quality underneath the blades helps maintain a fresh scent outdoors.
Crushed rock provides the necessary support for the synthetic blades. Workers damp the base with water to assist with the compaction process. A vibratory plate compactor creates a hard and stable surface for the grass. They check the levels multiple times to ensure a perfect grade. This solid foundation supports the grass through years of heavy use.
Turf Placement and Layout Plan
Roll out the synthetic grass across the prepared base with care. The blades should all face the same direction for a natural look. Artificial Turf for Pet Areas needs to relax in the sun before the final trim. This pause allows the material to expand and settle into place. Proper alignment creates a seamless appearance across the entire dog run.
Cut the edges with a sharp utility knife for a tight fit. Secure the perimeter with sturdy stakes or landscape staples at regular intervals. Tension across the surface prevents wrinkles or loose spots in the grass. This step keeps the area safe for dogs to run and play. Accurate cuts around trees or fences provide a professional and clean finish.
Seam Connection and Secure Fit
Seam tape connects separate pieces of grass into one large unit. Glue is applied to the tape to create a permanent and strong bond. Press the edges of the turf into the adhesive with firm pressure. This technique hides the joints and makes the lawn look like one piece. A well-bonded seam resists the pull of paws and teeth.
Galvanized nails or turf staples hold the center sections to the ground. Drive the fasteners deep so they do not protrude above the grass. Space the nails every few inches along the edges and the seams. This prevents the grass from shifting or lifting during high-speed dog chases. Secure attachment keeps the lawn flat and beautiful for a long time.
Infill Application and Blade Support
Spread infill material over the top of the synthetic grass fibers. This material keeps the blades upright and protects the grass backing. Select an antimicrobial infill to help with cleanliness and odor control. A drop spreader ensures an even coat across the whole pet zone. This layer adds weight to the turf and helps it stay in place.
Power brooms or stiff brushes help the infill settle deep into the pile. Brush against the grain to lift the blades for a lush look. This process distributes the granules evenly and hides the base of the grass. Infill also provides a soft cushion for the dog to rest on. Frequent brushing keeps the grass tall and attractive for many years.
Final Clean and Surface Finish
Rinse the entire area with water to remove dust and loose debris. This final wash helps the infill settle and cleans the grass blades. The yard now looks bright and ready for the pet to enjoy. Check all edges one last time for any loose bits or gaps. A clean finish ensures the dog area stays beautiful and functional.
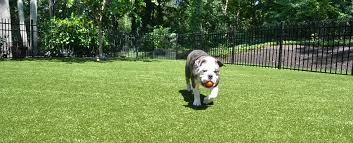
Regular maintenance involves a simple hose down to keep the space fresh. Remove solid waste promptly to maintain a high level of yard hygiene. Occasional brushing keeps the synthetic fibers from flattening over time. This routine preserves the beauty of the lawn with very little work. Your pet now has a perfect spot for exercise and relaxation.
A synthetic lawn transforms a messy yard into a pristine retreat for dogs. This durable surface eliminates mud and saves time on yard chores. For the best results, add a layer of deodorizer beneath the base to keep scents away. This simple tip ensures a fresh environment for the family and the dog. Owners gain a beautiful space that remains green and soft every day of the year.